söndag 25 september 2016

Dumping old ROMs

I usually read out roms with my USD50 MiniPro ROM reader. It is cheap, easy to use and support the most common ROMs. For Linux there is a project on Github vdudouyt/minipro that supports MiniPro from the command line There is a Windows client on the CD that comes with package.


Now, the older the system you want to dump is the more likely it is the MiniPro is not compatible. Instead of buying an expensive ROM reader I have chosen to try my luck with different kind of adapters where one simple solder cables and bend pins on intermediate sockets in order to get the ROM signals to look like a ROM known by MiniPro.

One of the first adapters I made was after some info on the Retrotechnology.com site that I found here. Afterwards I told Herb Johnson who run the site about my success reading a couple of Harris 7641 bipolar 512x8 bit roms and he was very happy and published what I have done. It was a very simple adapter though:
A very simple Harris 7641 adapter
The next adapter project was a bit too ambitious maybe, I wanted to read out two 82S100 ROMs that actually was not used for software but to save real estate and replace discrete logic on a Commodore PC20ii motherboard. It took a long time.

82S100 adapter top side
82S100 adapter bottom side

The 82S100 adapter was soldered and planned for days and weeks given the few hours I get in the garage for a few seconds of fame!


  So for the next adapter project I had much less time and came up with an idea. What if I just solder dangling breadboard cables to a socket and then placed them in the right place directly in the ROM reader? Then I could change the configuration for new roms as needed. The result took less then an hour to solder and with some electrical tape to keep them in place until closing the zero force socket on the ROM reader I successfully read a 82S123 device, a dangling 32 bytes!

Success!!
So this worked for me, make sure you know what you are doing before trying this at home!

torsdag 22 september 2016

MAME: Saving old computers

When writing a MAME driver for an old computer it is more to it than one can think of.

You are seldom lucky enough to get full schematics or even access to real hardware. Sometimes all you get is a rom file from someone that worked on the system ages ago and some general idea. If you are lucky there are documents about the system on the internet somewhere like www.bitsavers.org. Sometimes you find a forum thread from someone who bought something on Ebay and posted some pictures asking people what kind of machine it was. The information mining and detective work is the first phase of the adventure. The less you find the more eager you'll get to find out what it was. At least that is how I am geared. :)

The next best thing after schematics are detailed pictures of the PCB:s involved which reveals the chips and how they are interconnected. However even with this at hand the PCB has components which hides the traces on one side and there might not be a picture of the bottom.


In this picture I have both bottom and top side of the PCB. The bottom part is mirrored so I can easily follow traces from top to bottom through the via holes without getting confused. Since I don't have the actual hardware at hand I can't use a volt meter to test which pins are connected, I need to see it on the image. I used Gimp to fill in the traces from the 74LS138 chip to be able to make an address map which is needed to write a MAME driver.

MAME also has a built in debugger which can be used to see where the rom code accesses things and then guess which of the chips it is, usually setup patterns from other drivers can be seen and verify the guess together with the visual trace on the PCB image.

It is actually great fun to figure out old designs from clues like this. In the end this specific work will be documented in the driver  and on my Candela page for others to find out.

fredag 16 september 2016

MAME: Esselte 100 and serial support

The Esselte 100 has a rudimentary serial port that is available on the multi faceted I/O port labeled "Printer" where also the different measurement experiments are attached. In order to use the serial port in the emulator it has to be started with an emulated null modem cable attached to something.

In this example we will run it against a Telnet terminal. In order to get out of the emulated world and into the real world we attach it to a bit banger device which in turn needs to be attached to a socket server. These parts will translate the emulation time serial communication into a data stream through the socket server to the telnet terminal.


The null modem has built in support for the bitbanger and does the translation between stream data and the selected baudrate. This is how you set up MAME to work this way:

First you can check what devices is supported by a certain driver. The driver for Esselte 100 is called e100 and the option to use is called -listdevices:


The interesting information here is "RS232 Port" because it is a slot device which we can explore further with the -listslots option:


Here we can see that the RS232 port device called 'rs232' supports null modem. From not so well known sources we also know that the null modem support a bitbanger device which in turn accepts a socket address as argument like this:


This will start MAME as we want it to, The connection between the PIA pins and the rs232 device is defined in the emulation driver for the Esselte 100 and not something we can change from the command line. Once MAME is started you can open Putty.exe or you favorite Telnet terminal and connect it to the socket server using 127.0.0.1 (or the IP address of the machine running MAME if you are using a Telnet terminal on another machine) and port 4321 ( can be change to any port ).

Skip through the alerts at the beginning af the MAME session and at his point you will see two windows, one with Esselte 100 and one with the Telnet terminal:


The Esselte 100 starts in 7 bit, 1 start bit, 2 stop bits and 300 baud so we need to set up the null modem to talk to us at this speed through the internal menu system of MAME. This is enabled by pressing Scroll Lock and then TAB. Enter the "Machine Configuration" menu and change the settings accordingly:

Press TAB to exit the menu and select the Esselte 100 window. In order to use the serial port easy there is a terminal mode built in which takes the baud rate as argument:


Press some keys and there should be text in your Telnet terminal, the emulation has escaped into the real world!! :)

Not much more works at this point but this is a generic method how to connect emulated system with each other or to the outside world, enjoy!

torsdag 1 september 2016

MAME: Esselte 100 and other Didact designs


Now you can try how using a computer at the beginning of the 1980ies felt like. At the time they all suggested that you had to learn programming or at least use the prompt and usually they had a BASIC interpreter built in. Esselte 100 had only 12Kb of ROM to start with which was later upgraded to 16Kb. 

Thanks to some dedicated people at elektronikforumet.com, a swedish forum for electronic enthusiasts, I got hold of schematics and ROM:s so I could start my Didact project. Esselte 100 is a Didact design and here is how you can run it in MAME on a 64 bit Windows 7 computer:

1) First download the MAME Didact beta package here: Didact beta MAME 177
2) Extract it somewhere
3) From the command shell type: .\didact64d.exe e100 -window

Just press enter on the informational messages that pops up and you should now have a prompt!


From here you can explore the wonders of BASIC.

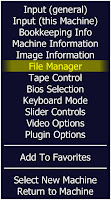
To use the cassette you first need to enable the pop up menu system in MAME by pressing Scroll lock. It will toggle the menu system so you can turn it off later by pressing Scroll lock again. Once the pop up menu system is enabled you get the main menu up by pressing TAB

Select the File Manager and then the cassette option to open the file dialog


In the file dialog navigate into the demos folder and select a BASIC demo. Once a wav file is selected the "cassette" is loaded an ready to be used.

To load the demo from the cassette issue a 'LOAD' command at the Esselte 100 prompt. The Esselte 100 will ask you if you are ready and of course you are, press 'Y'. To start the loaded cassette press F2 and a counter will appear showing you where on the tape you are.

Under 'Tape Control' in the main menu there are additional actions that you can take in order to navigate the tape in case you have several saved assets at the same cassette or want to create a new one. More on the latter below.

While loading the cassette the Esselte 100 displays what it loads and when done it will clear the screen and sit at the prompt awaiting commands. Now you can look at the code by issuing a 'LIST' command and of course run it by issuing a 'RUN' command:


Saving your own BASIC program is similar but you need to prepare a cassette first. This is done by selecting [create] in the file dialog shown above, use file name of your choosing and append a .wav suffix, because MAME will actually generate a wav file.

In the 'Tape control' menu there is 'record' option and once you have pressed it a wav file is being written to file so quickly exit to the Esselte 100 prompt and issue a 'SAVE' command. Shortly, well 300 baud can take a while, you precious work has been saved! :) Press F2

If you write a nice Esselte 100 demo and want to share it, let me know and I can add it to the distribution. If you sit on original Esselte 100 cassettes, dump them to WAV files through the microphone input on your computer and then try to load them into the emulator as described. I am very interested to know how that works, it is not yet tested. You can also contact me and I can do it for you.

History of Didact

Didact Laromedelsproduktion was started in Linkoping in Sweden by Anders Andersson, Arne Kullbjer and Lars Bjorklund.  They constructed a series of microcomputers for educational purposes such as "Mikrodator 6802", Modulab, Esselte 100 and the  Candela computer for the Swedish schools to educate the students in assembly programming and BASIC for electro mechanical applications such as stepper motors, simple process control, buttons and LED:s. Didact designs were marketed by Esselte Studium to the Swedish schools. The Candela computer was designed to be the big breakthough and developed by Candela Data AB, "a Didact Company". The Candela system was based around a main unit that could run OS-9 or Flex and a terminal unit that had a propietary software including CDBASIC. The Candela system lost the battle of the swedish schools to the Compis computer by TeleNova which was based on CP/M initially.  Later both lost to IBM PC as we know. Candela Data continued to sell their system to the swedish industry without major successes despite great innovation and sprit.