Visar inlägg med etikett Preservation. Visa alla inlägg

fredag 18 november 2016

The Prodigy #3 - make a ROM adapter

Well, the cheap ass adapter to get the R2912 ROM read involved a manual step to reassemble the ROM in which case I may have done it wrong and hunting ghost bugs afterwards. In any case when I saw the image to the left below I decided to go for the correct adapter and read out the R2912 as a 2764.


This worked out beautifully and we can now establish that the Rockwell R2912 is pin compatible with a 2364 mask programmable ROM. I wonder about the R2907 still but that's not our problem at the moment. :)

In order to fit the new ROM file into the MAME driver we need the following adjustments to the code:


We start at 0xe000 as rom now is 8KB or 0x2000 bytes in hex so the reset vector is at 0xFFFC. We also need to enlarge the size of "roms" region to 0x2000 and update the size of the rom to 0x2000. The offset where we load the rom within the "roms" section is still 0x0000 though.

Firing up MAME again we see that the reset vector now seems to be 0x60B7 which is within the identified actual ROM area. Since we mapped the "roms" at the top we end up in nowhere:


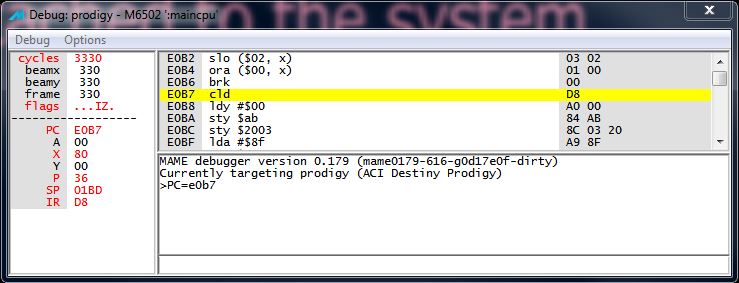
By setting the PC to 0xE0B7 we can observe and step though the actual code as long as it is position independent:

Now we end up in real code and it does stuff that will tell us more about the system. We can see that the code store things at 0xAB and 0x2003. The latter look very much like a device address which usually is decoded at a nice even address boundary such as 0x2000. This means the RAM is mapped at 0x0000.

So I will map some RAM at 0x0000 and the VIA at 0x2000 next, stay tuned Next -->

torsdag 17 november 2016

The preservation of the Prodigy Chess computer


I really like chess computers but usually they are too integrated to easily preserve so they kind of piled up in the garage: A Boris Diplomat, already preserved by Sean Riddle, a Mephisto Mini and a Mephisto Tutor among others. However this time I bid for an ACI Destiny Prodigy and got it!

The first thing to do in order to preserve an old MCU design is to check if anyone has done it before or if there are pictures of the inside already. I found plenty of information of this classic but no emulation in MAME or elsewhere easily found. Great, lets do it!

Among all the information on the net I found pictures of the PCB revealing it has a very discrete design, that is it uses a 6502 with external RAM and ROM chips that are easily accessible. So carefully I opened the chess computer revealing the PCB. Here I stumbled on the first issues, the RAM and ROM were not of brands I already knew:

The RAM is a Mitsubishi M58725P which I didn't recognize but a quick Google revealed that it is pin compatible with a standard 6116 2KB static RAM. So far so good. The ROM however, a Rockwell R2912, has no information easily available on Internet. The chess sites mentions that the ROM is 8KB but that would require more pins than the 24 shown in the pictures. I also saw that the pictures showed a R2907 so the information can refer to 8Kbit aka 1KB x 8 bits. EDIT: But didn't!

Interestingly enough the PCB from the net had other RAM and ROM brand, so my PCB was clearly a newer revision than the pictured one found on the Internet. Since I had no data sheet available the next step is to follow the traces and see if I can figure out what they are. This is done by a simple beeper:

I verified that all the pins were connected to the data or address bus according to the 24 pin 2716, which was my suspect and they were except for pin 18 (*OE), 20(*CE) and 21(VPP). Now the only danger I could think of was if the device required negative voltage which my ROM reader doesn't supply and which also in some cases are very destructive for the device if not supplied according to the datasheet.

I was looking carefully for circuits that could generate a negative voltage from batteries but none were found if it was even possible at the time to a cost suitable for a consumer grade product. I didn't think so and put the ROM into the ROM reader which happily read the ROM as a 2716!

Now starts the work of figuring out the inner secrets of the Prodigy hidden in the PCB and revealed by the ROM code. I will collect all info I find on my Prodigy page, stay tuned! Next-->

fredag 7 oktober 2016

MAME: Donated hardware for dumping

I got two PCB:s in the mail donated by Robert Quenet who is building emulator cabinets out of some old fruit machines.


Since I think the old fruit machines are worth preserving I dumped the roms and put up one page each to collect the information for later use.

The one at left was made 1993 by Fun Tech and based on a Z8400 processor and has 4 roms. While dumping one of the roms were sitting tight and the top broke off, either because the chip was old and had a crack or because I was a bit too eager. When I read out the content of the rom the reader told me a checksum that was different form what the label at the top said which worried me a bit, but soon later it has been verified that the rom was ok, only of the wrong size hence the checksum was wrong.

The one at the right was made around 1997/98 by Subsino and had only custom labels on the chips, however this brand is well known and there are drivers in MAME already which may fit the roms.

Just a day or so after I published the dumps I got the first results from Haze who had tinkered a bit with the Funtech roms and found that they fit well into one of two different drivers already in MAME too. He quickly produced the following screens from the roms:


Sooner or later these old fruit machine may be playable by people again without loosing loads of money and we all remember them from pubs and casinos end of the previous millennia!
Update: Early binary of the MAME emulation is here

tisdag 4 oktober 2016

MAME: Ironing out the address map from schematics

The other day I was very lucky, I got the schematics sent to me from Kron Ltd in Ukraine, for a thing I bought on the Ebay a year ago or so. The thing is a Kron K-180, a Z180 based terminal server from the mid 90:ies made up of east block TTL equivalent chips with Cyrillic characters! See my Kron180 page  for all the details.

When you got the schematics it can be quite easy to extract the address map. In this case we can see that the entire address space is divided into two parts by enabling the ROM when A15 is low and the RAM when it is high. We can also see that the A14 and A13 is not attached on the RAM chip since there is only 8Kb of RAM. This is how I present this to MAME:


The AM_REGION and AM_SHARE creates labels that I can use when loading the ROM and mapping the screen memory onto the emulated video device. The AM_MIRROR says that the A13 and A14 is not used when the range is selected hence it will be mirrored on the upper 24Kb om memory map. ADDRESS_UNMAP_HIGH simply says that unmapped areas are read as 0xFF.

The Zilog and other Intel like CPU:s also has an IO map, which Motorola like CPU.s doesn't. The IO map is selected when the special instructions IN and OUT are used and involves its own bus control signalling. Here the schematics are not as simple as for the RAM and ROM.

There are two decoder chips on the K-180 pcb that decides what device will be accessed and how, the first is the standard decoder chip 74138 and then there is a cascaded 74259 latch. They are hooked up like this:
74138
74259

As can be seen we now have all the address lines A0 to A7 defined. With a bit of tracing we can see that the Q0 output of the 138 is connected to the 259 at pin 14 which is active low. There is also A7 connected to pin 4 at the 138, active low. An interesting detail is that A3 is connected as data input to the 259 which means that there are different output level on O0-O7 accessing the 259 in IO range $00-$0F compared to $40-$4F and it is also locked until the next access.

The 138 is only active low during the access cycle itself. With all this information it is quite simple to trace the schematics and see what signals and devices are accessed for the Q1-Q7 outputs of the 138 and the O0-O7 output of the 74259.

Now, the Z180 has internal I/O registers between $0 and $3f which happens to overlap with the identified adress map, unless it is relocated. This can be done by setting the ICR register and by setting an IO access breakpoint at the ICR register in the MAME debugger we can easily verify that the internal registers are relocated to $80-$BF


74299
As a working assumption we model all accesses as writes just setting and pulse signals, except for 74299 which has an easily spotted parallel output that is connected to the data bus:

Then we can setup the complete IO map in our driver like this:


We handle the 259 latches as a single item since there are hidden data in the address. In order to debug this I declare stub functions in the K-180 board driver:


As can be seen there are special cases when accessing the 259 and also when reading from the 299. By setting a watch point in the MAME debugger we can verify that the assumptions are correct


Hmm, there are reads from offset $10 which is mapped to the AP5 line, interesting!

Checking out the schematics again we can see that AP5 is chip enable on another 74299 and that the writes to $F and $7 toggles the clock to the EEPROM. A not so wild guess is that the second 74299 is used to read out the EEPROM.

So I add another stub for reads at offset $10 and continue to go through the startup code as far as the code executes without crashing or misbahaving. When it does I need to go back and add real code to the stubs and reiterate the process until all devices in the IO map are identified.

Then the fun starts, stay tuned!

söndag 25 september 2016

Dumping old ROMs

I usually read out roms with my USD50 MiniPro ROM reader. It is cheap, easy to use and support the most common ROMs. For Linux there is a project on Github vdudouyt/minipro that supports MiniPro from the command line There is a Windows client on the CD that comes with package.


Now, the older the system you want to dump is the more likely it is the MiniPro is not compatible. Instead of buying an expensive ROM reader I have chosen to try my luck with different kind of adapters where one simple solder cables and bend pins on intermediate sockets in order to get the ROM signals to look like a ROM known by MiniPro.

One of the first adapters I made was after some info on the Retrotechnology.com site that I found here. Afterwards I told Herb Johnson who run the site about my success reading a couple of Harris 7641 bipolar 512x8 bit roms and he was very happy and published what I have done. It was a very simple adapter though:
A very simple Harris 7641 adapter
The next adapter project was a bit too ambitious maybe, I wanted to read out two 82S100 ROMs that actually was not used for software but to save real estate and replace discrete logic on a Commodore PC20ii motherboard. It took a long time.

82S100 adapter top side
82S100 adapter bottom side

The 82S100 adapter was soldered and planned for days and weeks given the few hours I get in the garage for a few seconds of fame!


  So for the next adapter project I had much less time and came up with an idea. What if I just solder dangling breadboard cables to a socket and then placed them in the right place directly in the ROM reader? Then I could change the configuration for new roms as needed. The result took less then an hour to solder and with some electrical tape to keep them in place until closing the zero force socket on the ROM reader I successfully read a 82S123 device, a dangling 32 bytes!

Success!!
So this worked for me, make sure you know what you are doing before trying this at home!

torsdag 22 september 2016

MAME: Saving old computers

When writing a MAME driver for an old computer it is more to it than one can think of.

You are seldom lucky enough to get full schematics or even access to real hardware. Sometimes all you get is a rom file from someone that worked on the system ages ago and some general idea. If you are lucky there are documents about the system on the internet somewhere like www.bitsavers.org. Sometimes you find a forum thread from someone who bought something on Ebay and posted some pictures asking people what kind of machine it was. The information mining and detective work is the first phase of the adventure. The less you find the more eager you'll get to find out what it was. At least that is how I am geared. :)

The next best thing after schematics are detailed pictures of the PCB:s involved which reveals the chips and how they are interconnected. However even with this at hand the PCB has components which hides the traces on one side and there might not be a picture of the bottom.


In this picture I have both bottom and top side of the PCB. The bottom part is mirrored so I can easily follow traces from top to bottom through the via holes without getting confused. Since I don't have the actual hardware at hand I can't use a volt meter to test which pins are connected, I need to see it on the image. I used Gimp to fill in the traces from the 74LS138 chip to be able to make an address map which is needed to write a MAME driver.

MAME also has a built in debugger which can be used to see where the rom code accesses things and then guess which of the chips it is, usually setup patterns from other drivers can be seen and verify the guess together with the visual trace on the PCB image.

It is actually great fun to figure out old designs from clues like this. In the end this specific work will be documented in the driver  and on my Candela page for others to find out.

torsdag 14 april 2016

VHS preservation and video editing

I have just saved a VHS tape from 1982 filmed at a rehearsal with a band I played in as a teenager. Some time ago I saved my mothers old DVD/VHS recorder, a Panasonic NV-VHD1, which for some reason was going to the recycling, but I figured it will have its use with me instead.


 Second stage was to get a video grabber and I borrowed one with USB from my son that has used it to capture retro game play, a Plexgear Moviesaver 220 VHS
After installing the Plexgear Moviesaver driver and application for Windows 7 and connecting all the cables it was no problem at all to insert the tape in the VHS cassette player and press play and then record in the application. It worked as expected and stored the VHS content as a MPEG-2 audio/video file at the same time as displaying it in the app so it was really easy to manage.

I've had preferred to do it on Linux but I found no luck for this USB device after some Googling around on the subject and I have stopped trying Linux when it lacks support and started to do the right things rather the things right always.

When reviewing the tapes I realized that I wanted to share some of it, but 30 minutes of rehearsal was too much for anyone to watch these days so I picked the shortest song recorded, it was 2 minutes roughly, perfect for the restless era of internet!

But even the two minutes were filled with recording errors such as out of focus passages and pointless pans. Especially when zooming in at the wrong guy during both solos in the song, how hard was it really?! :-p

I had to do something about it and downloaded Blender, a blender for digital content, and in fact the VHS content was digitized, so what was I waiting for? Said and done, I downloaded Blender on both my Windows-7 machine and my Ubuntu 14.04 Linux machine and they worked right off the bat, great out of the box experience!

Except for that I didn't have a clue how to edit video that was.... and Blender just scared the sh*t out of me when I first started it up with its about 2 zillions menus and options. The first I saw was a 3D editor... So I looked around at Youtube and found a couple of guys who thought they knew more than average about Blender.

After screening out the web cam generation, speed talkers and guys with voices I couldn't stand I finally  selected a guy in the thirties that had a long series of Blender video editor instructional videos, like 25-30 of 5 minutes each. I highly recommend Mikeycal Meyers for people who wants to know how to edit video with Blender


I spent some time looking at the fiorst 10-15 videos and then I said to myself that this was easy and dived in. After about 5 minutes I was totally lost, I remembered what I could do with Blender but hardly anything about how! So restart, I rigged my laptop with the instructable videos on the right of my big(er) secondary computer screen and fired up Blender there. Much better! After some fumbling I got the hang of it and after the initial 3-4 videos I knew enough to create my 2 minutes video:
This is a very basic example of what you can do with Blender, just cutting some tracks and arrange them in an arbitrary order. Blender let me copy video fragments from other parts of the VHS recording and put them on top of the poorly shot video during the song. The original video is never harmed! You simply press a button when you want produce the video. Then you are a producer!

If I have had a better memory or more time I would have made a rocket ship with what was tutored in the rest of the videos but that is for another day and another movie, this is good enough and a lot of fun! I am playing the drums btw!


torsdag 24 mars 2016

MAME the virtual retro system archive

For some time now I have hacked bits and pieces of code for the MAME project. It started out as I needed a convinient way of debugging code I hacked for a retro machine and MAME quickly appeared on my radar as the best versatile vehicle to host my ideas. In fact when I started the part I was interested in was called MESS but this project has now converged back into the MAME project event though the core MESS devteam seems to lurk around in one forum and the hardcore arcade people more in another. The boundaries are not strict and over time noone will remember the distinction.


My growing interest in MAME was not the gaming part itself but the opportunity to run old code in emulated hardware. The "old code" resides on harddisks tapes and floppy disks of various sizes in my garage. I also realized that I could recreate old systems I once worked with back in the CRT era when people still had to write clean good code just because to fit it into the precious ROM/RAM. Moore's law killed that reason and the code nowadays are huge, complex and with endless layers of abstractions that blocks the horizon. The MAME source code is no different which I soon learnt the hard way.

The cool thing with MAME is that it prepared to emulate things at an arbitrary level of detail, only limited by, that's right, Moore's law! The things that are most demanding to emulate are the analog parts of old computers but MAME also emulates analog circuitry such as the famous Pong game from 1972


Compare with the MAME emulation done in 2015

MAME bases the emulation on the hardware design rather then trying to mimic the behavior and appearance. For obvious reasons there are trade offs where emulation meets the real world and the user from 2015 interacts with the creation from 1972.

In the end MAME, or one of its forks, might be the only way to run your old software, unless another project catches up which seems unlikelly. So that may save the day when it comes to hardware but the really big problem is "bit rot". This is when the bits are fading away from the original storage media and why it is important to dump the information before it vanishes. But that is a huge subject for later.